After an expedition to Spotlight and a super awesome craft day with Chloe, I had all the supplies I needed to begin my wicked little craft project. A couple of months later, I finally finished it! Now, it really shouldn't have taken me so long to complete, as I said - it was a 'wicked little' project, but all my hobbies have fallen by the wayside, to make way for a massive life roller coaster ride. Nope, we didn't give Dreamworld a second chance (you can read about our disappointment with that here). Instead we have been going through some fertility down-up-down's.
If you have spoken to Adam or myself lately, you would know exactly what I am talking about. If we haven't had the pleasure of your company in recent times, then it's possible we have some big catching up to do!
When checking out my favourite blog younghouselove last week I saw that they had re-issued another Pinterest challenge. This is where they challenge themselves and their readers to finish one of the awesome idea's they have pinned on Pinterest. It turns out I'm not the only person who pins a million DIY inspirations, and barely gets around to doing one. Needless to say, I was inspired to get my butt into gear, finish what I started and get back to blogging about it!
Back when I was a wee lass, I used to make Disney characters out of FIMO, a polymer clay that you can bake in the oven. I totally made Aladdin, Jasmine, Genie, Abu and even the flying carpet. I still have them, buried in a box in the garage somewhere. If I come across them in a clean up one day, I promise to post them. Needless to say, I've got super clay molding skills from way back. FIMO wasn't available at Spotlight, but Sculpey was. Same, same. Different name.
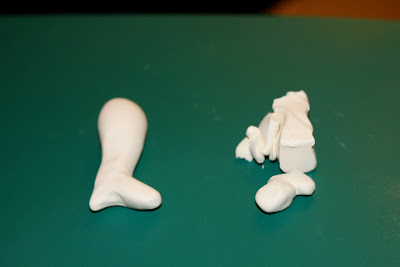
I kneaded the clay until it was soft and then got to work making me a leg! It took me a while to get the shape I wanted, and in the process I raided my manicure set to use the cuticle pushers help me achieve it.
When I did get a leg I liked - the next challenge was making another one the same size, shape and length. It took me a couple of re-starts, but I got there. I cut a slit in the top of the legs, to make way for the cardboard part of my bookmark and popped them on baking paper, on a baking tray and into the oven, and baked them according to the instructions on the packet.
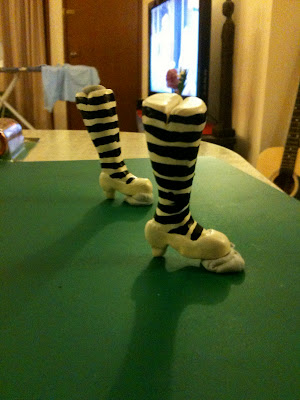
The legs kinda splayed a little in the cooking process. If she was human, she might want to consider bilateral tib-fib osteotomies to correct her deformity. If I was to make them again, I would probably consider another position to stop the splay, though I'm not sure what would work better. But I figured I could position them on the card in a way that would make it less obvious. When they were cooked and cooled, I stood them up with bluetack and prepared to paint. I did white as a base (as the legs were an ivory creamy colour, and I wanted stark white), and followed by hand painting black stripes... Turns out my freehand skills are very underwhelming.
I even got confused on how to paint in a circle around the leg, with some of the lines matching up when they really shouldn't have. I tried to fix my mistakes, by painting some white over the black... but that looked, pretty damn hideous.
What a mess. My husband was at the other end of the table, intricately painting his Skaven rat army - and doing a wonderful and detailed job, even with his man hands. And here I am with my skinny little crooked witch fingers, incapable of painting some stripes on a leg. I didn't have enough remaining Sculpey to make some more legs, so I got to googling to find out if I could remove the acrylic paint. There was a whole bunch of suggestions - but it turns out a mix of nail polish remover, water, persistence and scraping it with my nails will get acrylic paint off your polymer clay legs - and in the end they looked as good as new!
Determined to get some straight clear lines, I came up with a new strategy and cut some painters masking tape into tiny thin strips and stuck them to my pair of legs.
I thought they looked pretty cool like this, like some sort of albino buckled goth boot in miniature form. Alas, this was not part of my bookmark quest, so I painted in the gaps with black, which at a glance looks terrible.
But I then peeled off the masking tape using tweezers (thankyou again nail polish box!), and lo-and-behold, a much better result. There was still a little bleeding - I think its the way I jabbed instead of stroking the paintbrush. If I was to do it again I think I would get alot less leakage.
Next I got to painting the roses shoes red.
Once dry, I used a mod podge (wrap it in a brown paper package tied up with string, that shit is my new favourite thing) and red glitter mix to make them sparkle ruby red.
Next up I made some super cute little bows.
Once cooked, I painted them red, and attacked them with modpodged glitter. Next I had to work out how to put them on. Lightbulb moment - I bought a hot glue gun a little while back and now I have an excuse to use it!! But then the dilemma... I have no idea how to use it. I did what any youth of today would do and found a youtube clip to teach me how!
Yes, my hot glue gun is pink!
I also had to stick the in book part of my creation. In case you hadn't worked it out, (tho I'm sure you have... it's pretty bleeding obvious)- I am making my very own Wicked Witch of the East bookmark. It will be like the book fell on her, instead of the house. Keeping that in mind, I decided that the card part of the bookmark should be an old-school shingle roof. I had to print it off at my parents because it seems every time I go to use our printer, it's out of ink. What is with that? I feel like I never use it, but when I do - I have to replace the cartridges!
Anyways, I stuck the bows on with the baby pink hot glue gun, and it was not as satisfying as I was expecting. It dried really quick and was super stringy. Still it managed to do the job when it came to sticking the bows on, but I decided it was not the right stuff to attach the card with. Instead I dribbled PVA glue into the slots at the top of the legs, pushed the card in and left it to dry overnight.
The result?
Pure awesomeness.
And just incase you were wondering... yes she can stand all by herself. Though, she is alittle bit alot on the tilted side. She looks like she is drunk. Kinda reminds me of the super drunk chick I saw in Surfers when out for a friends Hen's Party. Every time this girl tried to bend over to pick her bag up off the ground, with her hand out-stretched she could never reach it - she'd lose her balance and start falling backwards. Possibly one of the funniest things I've seen this year.
Pretty super huh?
I popped her in my current TrueBlood book. Pinterest Challenge complete.
This fantastic craft project was found by following the yellow brick road to Pinterest and beyond.
Once cooked, I painted them red, and attacked them with modpodged glitter. Next I had to work out how to put them on. Lightbulb moment - I bought a hot glue gun a little while back and now I have an excuse to use it!! But then the dilemma... I have no idea how to use it. I did what any youth of today would do and found a youtube clip to teach me how!
Yes, my hot glue gun is pink!
I also had to stick the in book part of my creation. In case you hadn't worked it out, (tho I'm sure you have... it's pretty bleeding obvious)- I am making my very own Wicked Witch of the East bookmark. It will be like the book fell on her, instead of the house. Keeping that in mind, I decided that the card part of the bookmark should be an old-school shingle roof. I had to print it off at my parents because it seems every time I go to use our printer, it's out of ink. What is with that? I feel like I never use it, but when I do - I have to replace the cartridges!
Anyways, I stuck the bows on with the baby pink hot glue gun, and it was not as satisfying as I was expecting. It dried really quick and was super stringy. Still it managed to do the job when it came to sticking the bows on, but I decided it was not the right stuff to attach the card with. Instead I dribbled PVA glue into the slots at the top of the legs, pushed the card in and left it to dry overnight.
The result?
Pure awesomeness.
And just incase you were wondering... yes she can stand all by herself. Though, she is a
Pretty super huh?
I popped her in my current TrueBlood book. Pinterest Challenge complete.
This fantastic craft project was found by following the yellow brick road to Pinterest and beyond.


